Installing WSL2 on Windows - My Experience and Tips
I recently switched my main development machine to Windows, and after hearing countless recommendations about using WSL2 for development on Windows, I decided to take the plunge and install WSL2 (Windows Subsystem for Linux) on my computer. The whole process turned out to be quite the adventure—more complex than I initially anticipated—so I'm sharing my installation notes here in case they help fellow developers avoid some of the bumps I encountered.
Table of Contents
- Installing WSL2 and Ubuntu
- Setting up Ubuntu User Info
- Configuring Windows Terminal
- Integration with VSCode
- Installing Git on Ubuntu
- Installing nvm, Node.js, and npm on Ubuntu
- Reference
Installing WSL2 and Ubuntu
-
Open Windows PowerShell in terminal
-
Run the command:
wsl --install-
Note: The official documentation states "Open PowerShell or Windows Command Prompt in administrator mode by right-clicking and selecting 'Run as administrator', enter the wsl --install command, then restart your machine." However, for some reason, I was able to install it without running as administrator. Your mileage may vary!
-
After running this command, your computer will install both "Windows Subsystem for Linux" and "Ubuntu", then prompt you to restart for the changes to take effect.
-
After restarting, my terminal automatically launched and began downloading Ubuntu, which took quite a while. I suspect this is because the restart only installs the executable files initially, and the actual download/installation happens after the reboot.
-
Linux has many distributions, and Ubuntu is just one of them. This command defaults to downloading Ubuntu, but you can actually choose other distributions if you prefer. Once you develop your own preferences, you might want to experiment with other distros.
-
Setting up Ubuntu User Info
-
Start > Open Ubuntu
-
Enter your user account and password
-
Update and upgrade packages:
sudo apt update && sudo apt upgrade- Note: Windows won't automatically update or upgrade your Linux distribution—this is something most Linux users prefer to control themselves.
Configuring Windows Terminal
Adjusting Default Profile and Default Terminal Application
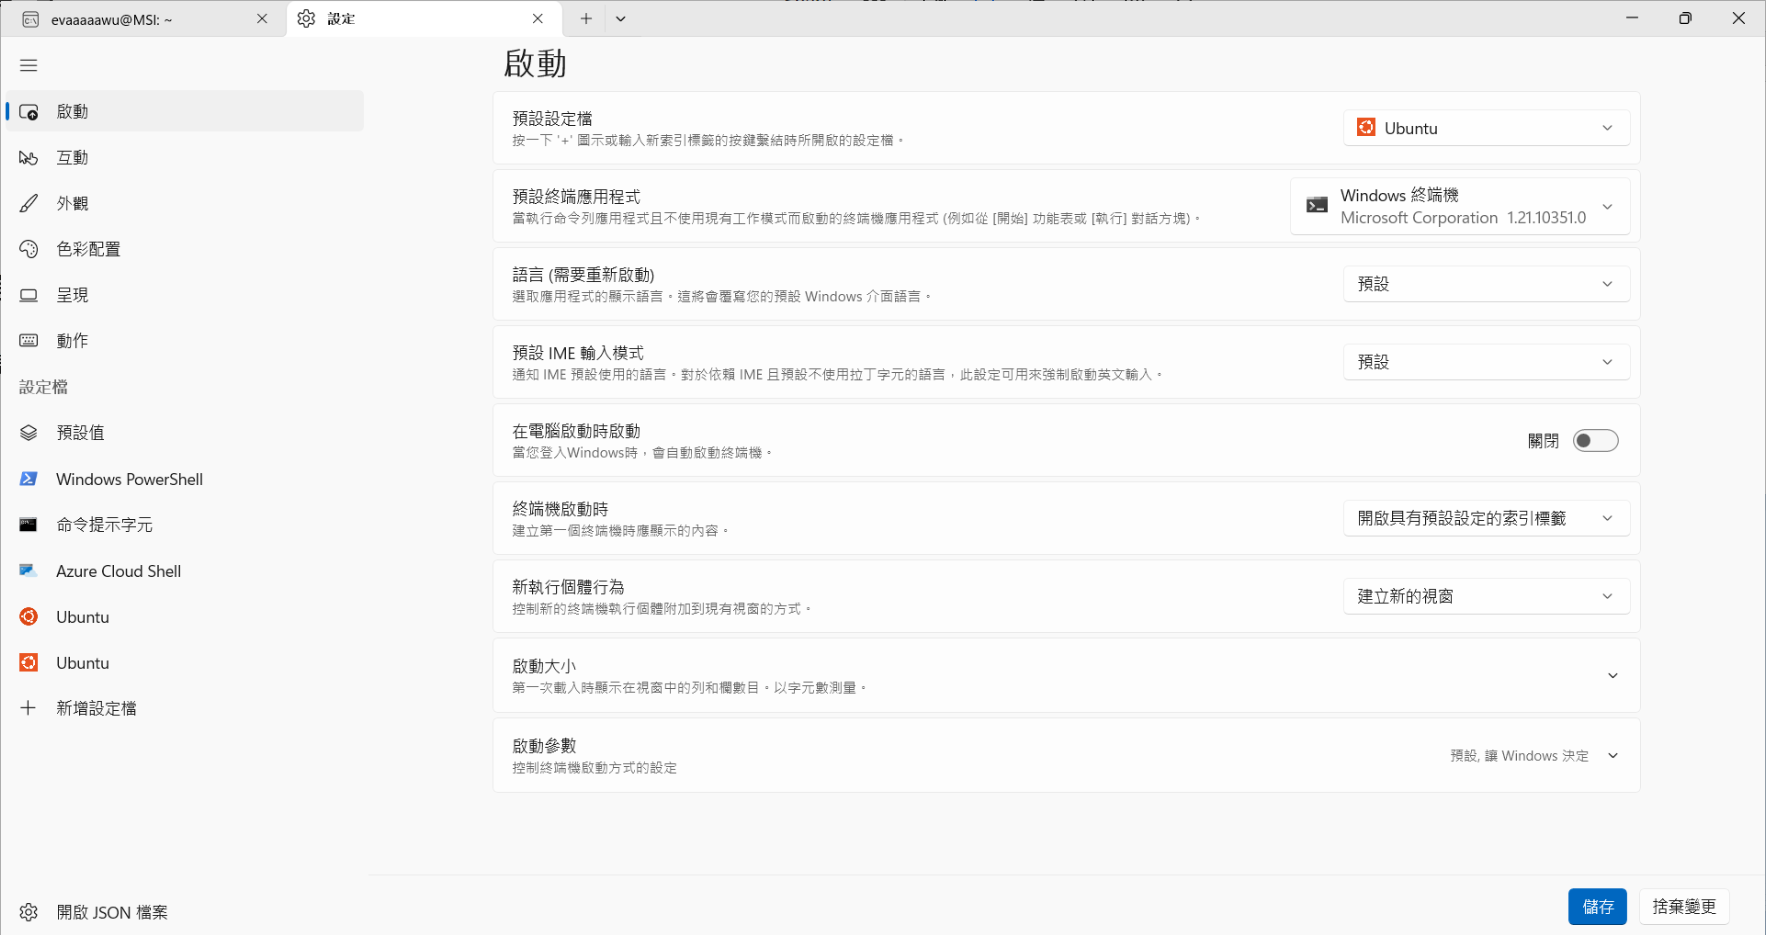
In your computer's "Settings > Startup", adjust the "Default profile" and "Default terminal application". Here are my settings:

Using Oh My Posh to Make Ubuntu Beautiful and Readable
[Installing Nerd Font]
-
According to Microsoft's documentation: "To see all glyphs in your terminal, we recommend installing a Nerd Font like Cascadia Code NF, which you can download from the Cascadia Code release page."
-
After downloading, drag all the .otf or .ttf files into your computer's "Settings > Personalization > Fonts". I chose to use the .ttf files (since I noticed that Oh My Posh's CLI defaults to installing .ttf files when installing fonts through the terminal). The download also includes .woff2 files, which are primarily used for web development and aren't suitable for Windows system font installation.
You don't have to use Microsoft's recommended font—honestly, after using it for a while, I wasn't particularly impressed with how it looked. I'll probably switch to something more appealing once I find a font I actually like.
[Using Oh My Posh to Customize WSL Prompt]
-
Run the command:
curl -s https://ohmyposh.dev/install.sh | bash -s- If you get an "unzip is required to install Oh My Posh. Please install unzip and try again" error, run
sudo apt updateandsudo apt install unzip, then try the command again.
- If you get an "unzip is required to install Oh My Posh. Please install unzip and try again" error, run
-
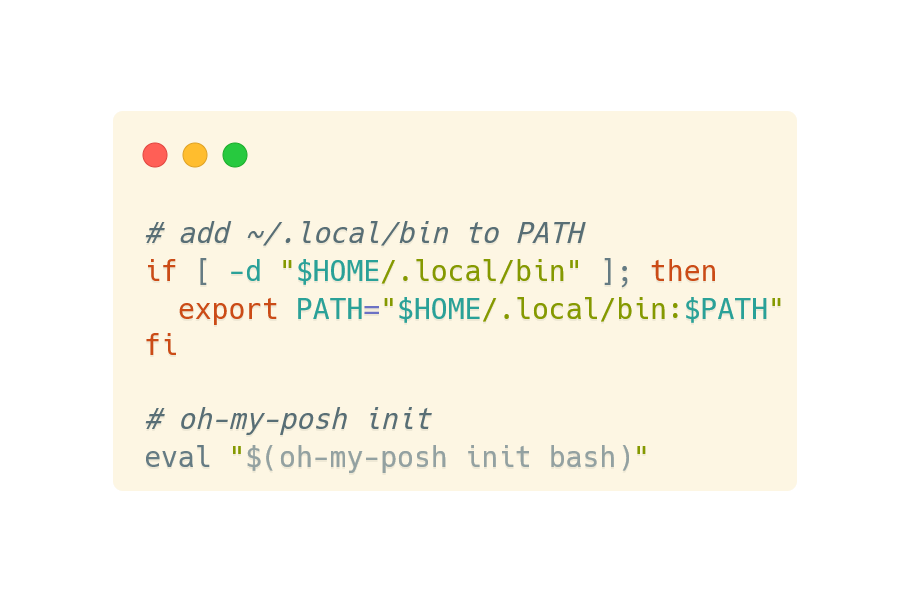
Add the following code to your .bashrc file (at the end):

- Run
source ~/.bashrcor restart your terminal to apply the settings.
[Configure Terminal to Use Nerd Font]
-
Run the command:
oh-my-posh font install CascadiaCode- Note: The official documentation recommends installing Meslo, but we previously installed CascadiaCode on our system.
-
Open Terminal settings (default shortcut:
CTRL + SHIFT + ,), and insettings.jsonunderprofiles>defaults>font, add"face": "Cascadia Code NF"- Note: CascadiaCode includes many font variants. Make sure to choose one that supports Nerd Font (like the "Cascadia Code NF" I selected), otherwise the icon portions of the interface won't display properly.
-
(Optional) Configure a theme or custom prompt configuration
You can customize your preferred theme style by replacing
eval "$(oh-my-posh init bash)"in your .bashrc file witheval "$(oh-my-posh init bash --config "$HOME/.cache/oh-my-posh/themes/M365Princess.omp.json")".Here,
M365Princess.omp.jsonis just one theme option—you can always switch to a different theme that catches your fancy later.

Integration with VSCode
Install the Remote Development extension pack in VSCode (which includes 4 extensions, one of which is WSL). For future development, you'll want to store your project folders in \\wsl.localhost\\Ubuntu\\home\\evaaaaawu (replace "evaaaaawu" with your actual username).
The trickiest part here is backup management. Storing projects in this location doesn't seem to offer the same convenient automatic cloud backup that you get when storing files in the regular Windows file system. I've found that you can use a package called rclone for syncing backups to the cloud, but I haven't tried it yet. For now, my solution is just to remind myself to manually backup regularly—not ideal, but it works.
Installing Git on Ubuntu
-
I ended up choosing to install Git through Homebrew, so I needed to install Homebrew first:
/bin/bash -c "$(curl -fsSL https://raw.githubusercontent.com/Homebrew/install/HEAD/install.sh)" -
After installing Homebrew, I could install Git through it:
brew install git -
Use
git --versionto verify the installation was successful -
Configure Git with these two commands:
-
git config --global user.name "Your Name" -
git config --global user.email "[email protected]"
-
-
After completing these steps, you should be able to use Git in your WSL2 environment. However, there's one annoying hiccup: every time you want to push a project to GitHub, you'll need to enter your username and password (personal access token). The solution is to set up Git Credential Manager. Run these three commands in your terminal:
-
Configure WSL2 to use Windows' Git Credential Manager:
git config --global credential.helper "/mnt/c/Program\ Files/Git/mingw64/bin/git-credential-manager.exe" -
Configure GCM to use the correct storage backend (optional but recommended):
git config --global credential.credentialStore wincredman -
Configure GCM for your specific hosting service (optional)
For GitHub:git config --global credential.https://github.com.useHttpPath true
-
Installing nvm, Node.js, and npm on Ubuntu
-
Run the command:
curl -o- https://raw.githubusercontent.com/nvm-sh/nvm/master/install.sh | bash -
Restart your terminal
-
Install the current stable LTS Node.js version (recommended for production applications):
nvm install --lts -
Install the current Node.js version (for testing the latest Node.js features and improvements, but more likely to have issues):
nvm install node -
List installed Node.js version numbers:
nvm ls -
Check the current default version:
node --version -
Verify npm is also installed:
npm --version -
How to switch Node.js versions in your WSL2 environment editor:
-
Check the current default version:
node --version -
List all available Node.js versions:
nvm ls-remote -
To switch to another version, use nvm use [version number]. e.g.,
nvm use v8.2.1 -
Switch to LTS version:
nvm use --lts -
Switch to current version:
nvm use node
-


