在 Windows 上安裝 WSL2 經驗分享
前一陣子因為把主力使用電腦換成了 Windows,加上看過很多人推薦過在 Windows 上使用 WSL2 環境進行開發,於是花了一些時間安裝 WSL2(Windows 子系統 Linux 版) 在我的電腦上,整個過程還蠻繁瑣複雜的,所以這裡來分享一下我的安裝筆記。
Table of Contents
- 安裝 WSL2 和 Ubuntu
- 設定 Ubuntu 的 user info
- 設定 Windows Terminal
- 與 VSCode 搭配使用
- 在我的 Ubuntu 安裝 Git
- 在我的 Ubuntu 安裝 nvm、node.js 和 npm
- Reference
安裝 WSL2 和 Ubuntu
-
打開 terminal 的 windows powershell
-
輸入指令:
wsl --install-
note: 官網說 「Open PowerShell or Windows Command Prompt in administrator mode by right-clicking and selecting "Run as administrator", enter the wsl --install command, then restart your machine.」但不知道為什麼我沒有 Run as administrator 就可以安裝了?
-
執行指令後,電腦會幫你安裝「Windows 子系統 Linux 版」和「Ubuntu」,並要求你重新開機,變更才能生效。
-
重新開機後,我的 terminal 會自動啟動並幫我下載 Ubuntu,需要一段蠻長的時間等待它下載(這邊我不太知道為什麼,可能是重新開機前 Ubuntu 只有安裝好執行檔,重新開機後才有辦法開始下載安裝好的執行檔?)
-
Linux 有很多發行版,Ubuntu 是其中之一,這個指令會預設自動幫你下載 Ubuntu,但你其實也可以選擇別的發行版來下載,或許未來有自己的偏好後可以再下載其他發行版試試看。
-
設定 Ubuntu 的 user info
-
開始 > 打開 Ubuntu
-
輸入 user account 和 password
-
更新和升級套件:
sudo apt update && sudo apt upgrade- note: Windows 不會自動更新或升級你的 Linux 發行版本,這是大部分 Linux 使用者希望能自行控制的工作。
設定 Windows Terminal
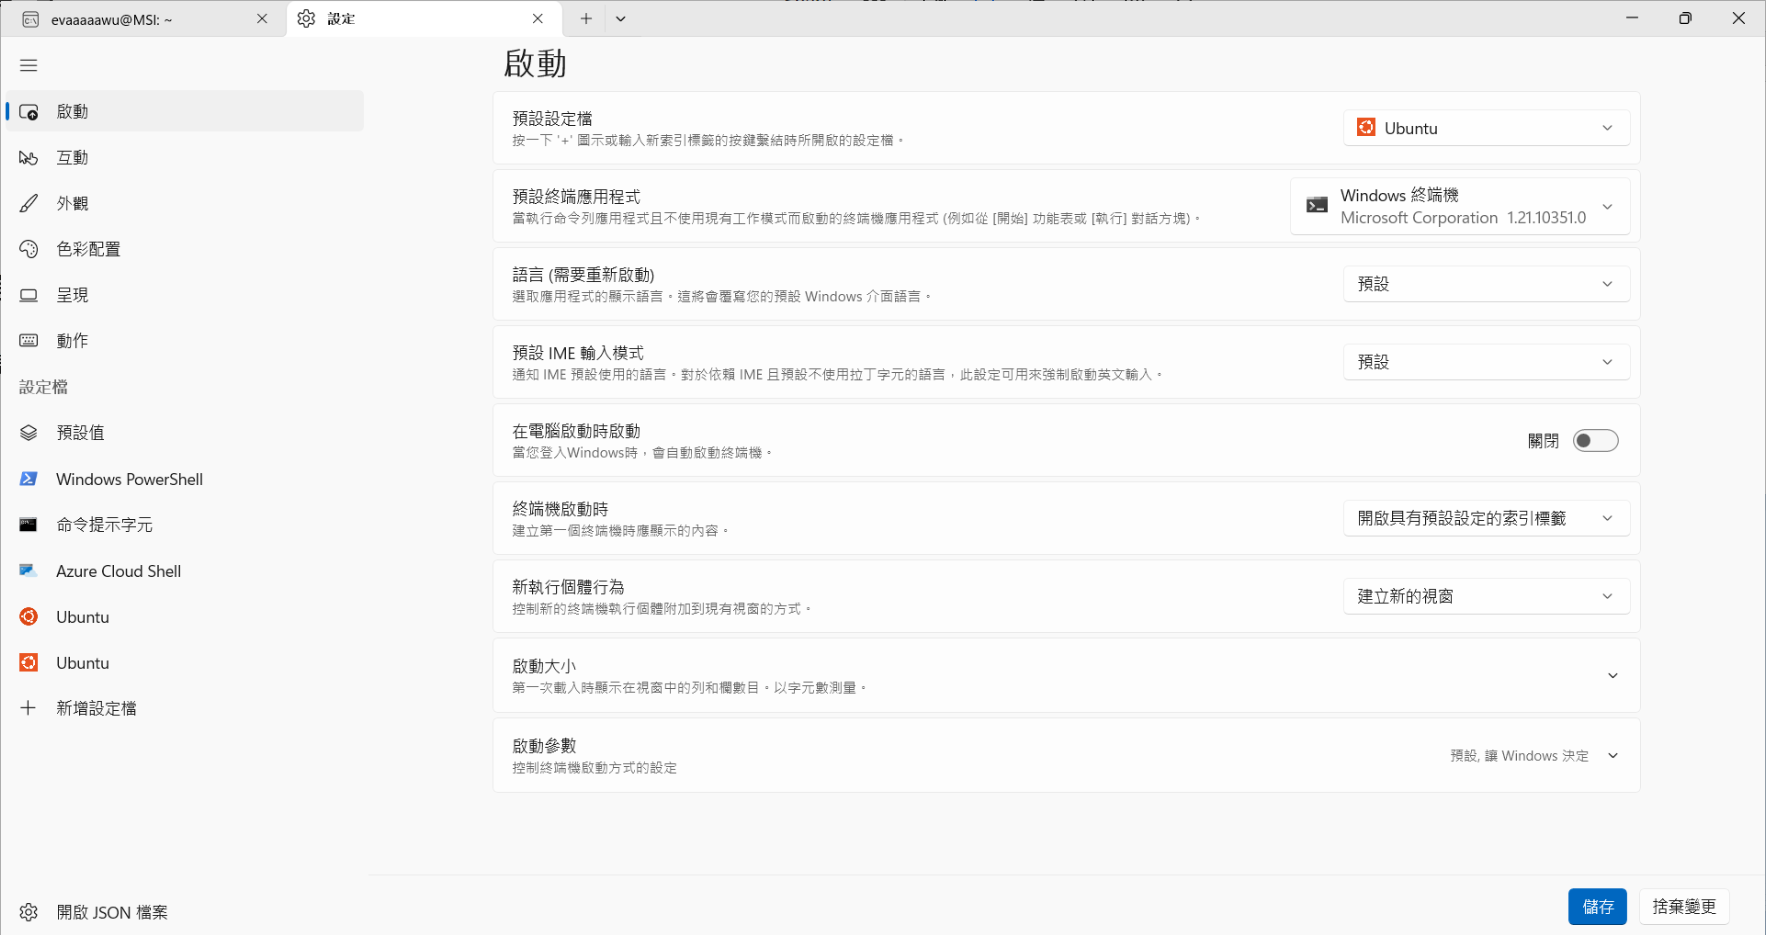
調整「預設設定檔」和「預設終端應用程式」
在電腦的「設定 > 啟動」中調整「預設設定檔」和「預設終端應用程式」,我的設定如下:

使用 Oh My Posh 讓我的 Ubuntu 變美觀和好閱讀
[安裝 Nerd Font]
-
根據 Microsoft 文件:「若要查看終端機中的所有字元,建議您安裝類似 Cascadia Code NF 的 Nerd Font,您可以從 Cascadia Code 發行頁面下載。」
-
下載後,把所有 otf 或 ttf 檔案拖曳進電腦中的「設定 > 個人化 > 字型」裡面,我選擇使用 ttf 檔(因為後面看到使用 Oh My Posh 的 CLI 在終端機安裝字體時,它的預設好像是會安裝 ttf 檔)。另外,下載的內容中還有 woff2 檔案,此類型的檔案主要用於網頁開發,不適用於 Windows 的系統字型安裝。
這裡不一定要使用 Microsoft 推薦的字體,實際使用後我也沒有覺得這個字體很好看,如果以後有遇到喜歡的字體我很可能就會把它換掉了。
[使用 Oh My Posh 自訂 WSL 提示]
-
輸入指令:
curl -s https://ohmyposh.dev/install.sh | bash -s- 若出現 unzip is required to install Oh My Posh. Please install unzip and try again. 錯誤,則執行
sudo apt update和sudo apt install unzip,然後再輸入一次指令。
- 若出現 unzip is required to install Oh My Posh. Please install unzip and try again. 錯誤,則執行
-
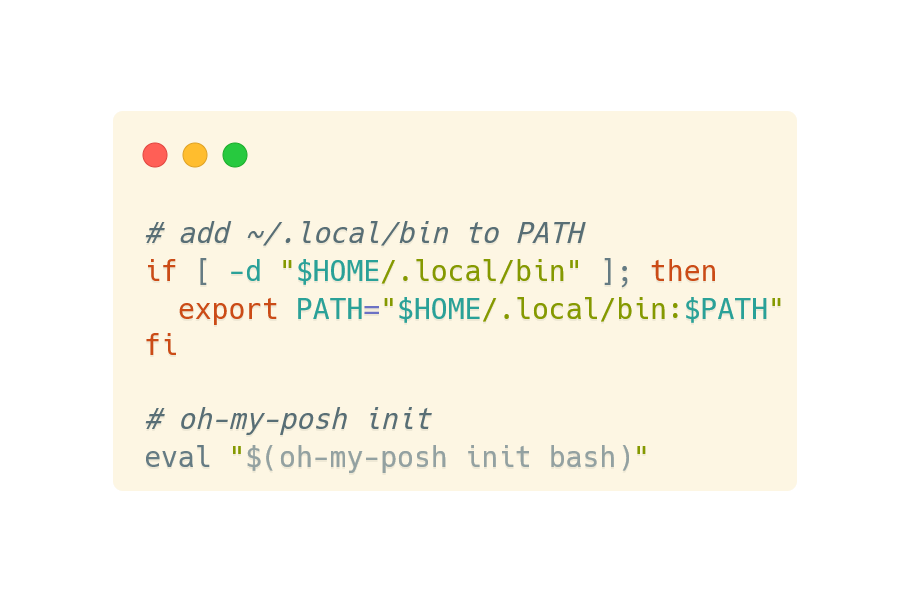
在 .bashrc 檔案裡面放入以下程式碼(放最後面):

- 執行
source ~/.bashrc或重新啟動終端機讓設定生效。
[設定 terminal 使用 Nerd Font]
-
輸入指令:
oh-my-posh font install CascadiaCode- notes: meslo 是官方文件推薦安裝的字型,但我們先前在電腦安裝的字型是 CascadiaCode
-
打開 Terminal settings (default shortcut:
CTRL + SHIFT + ,),在settings.json的profiles>defaults>font裡面加入"face": "Cascadia Code NF"- notes: CascadiaCode 中有很多字型可以選擇,這裡要選有支援 Nerd Font 的字型(例如我選的 Cascadia Code NF),不然外觀有 icons 的部分會顯示不出來...
-
(optional) configure a theme or custom prompt configuration
可以自行設定想要的主題樣式,具體的作法是把 .bashrc 檔案的
eval "$(oh-my-posh init bash)"取代成eval "$(oh-my-posh init bash --config "$HOME/.cache/oh-my-posh/themes/M365Princess.omp.json")"。這裡的
M365Princess.omp.json是其中一個主題,之後也可以換成別的自己喜歡的主題。

與 VSCode 搭配使用
在 VSCode 中安裝 Remote Development 插件(裡面包含 4 個插件,其中一個是 WSL),未來開發時要將專案的資料夾存放在 \\wsl.localhost\\Ubuntu\\home\\evaaaaawu 裡面(evaaaaawu 改成自己的 user name)。
這裡我覺得比較麻煩的是備份問題,把專案放在這裡好像沒有像放在原本的 windows 作業系統中可以很方便的自動備份到雲端,我有查到可以用 rclone 這個套件進行同步到雲端的備份作業,但目前我還沒有試過,所以現在我的方法就是要提醒自己記得定期手動備份。
在我的 Ubuntu 安裝 Git
-
這裡我後來選擇的是透過 Homebrew 安裝 Git,所以在安裝 Git 之前要先安裝 Homebrew:
/bin/bash -c "$(curl -fsSL https://raw.githubusercontent.com/Homebrew/install/HEAD/install.sh)" -
安裝完 Homebrew 後,就可以透過 Homebrew 安裝 Git:
brew install git -
可以使用
git --version指令確認是否有成功安裝 -
使用下列兩個指令設定 Git
-
git config --global user.name "Your Name" -
git config --global user.email "[email protected]"
-
-
執行完以上步驟,基本上就可以在 WSL2 環境中使用 Git 了,但有一個麻煩的地方是每次要把專案推上 Github 時,都必須要輸入 username 和 password(personal access token) 才有辦法推上去。這裡的解決方法是可以設定 Git Credential Manager。執行步驟是在終端機輸入以下三個指令:
-
Configure WSL2 to use Windows' Git Credential Manager:
git config --global credential.helper "/mnt/c/Program\ Files/Git/mingw64/bin/git-credential-manager.exe" -
Configure GCM to use the correct storage backend (optional but recommended):
git config --global credential.credentialStore wincredman -
Configure GCM for your specific hosting service (optional)
For GitHub:git config --global credential.https://github.com.useHttpPath true
-
在我的 Ubuntu 安裝 nvm、node.js 和 npm
-
輸入指令:
curl -o- https://raw.githubusercontent.com/nvm-sh/nvm/master/install.sh | bash -
重啟終端機
-
安裝目前的穩定 LTS Node.js 版本(建議用於生產應用程式):
nvm install --lts -
安裝目前的 Node.js 版本(用於測試最新的 Node.js 功能和改進功能,但更有可能有問題):
nvm install node -
列出已安裝 Node.js 的版本號:
nvm ls -
查看目前使用的預設版本:
node --version -
確認 npm 也有安裝:
npm --version -
未來在 WSL2 環境的程式編輯器切換 Node.js 版本方法:
-
查看目前使用的預設版本:
node --version -
列出所有可用的 Node.js 版本:
nvm ls-remote -
若要切換成其他版本,使用 nvm use [版本號自行輸入]。e.g.,
nvm use v8.2.1 -
切換至 LTS 版本:
nvm use --lts -
切換至目前版本:
nvm use node
-


